
Since early December of 2019 I have been posting on Facebook and Instagram, a variety of double layered woollen mittens all made out of upcycled clothing. Sweaters with too many stains or holes, sweaters that have been washed a little too hard and have shrunk or been felted too much, wool underwear that has too many holes to bother repairing, or too many stains to be comfortable with. With every post of a new pair of mittens a number of people have asked me if I have a pattern or how to make them. I’ve had one course at Upscale in January on exactly this. But, I know that not all of you live around Sandane and have the chance to join a workshop J. So, I’ve decided to try my hand at writing out a pattern and explaining how I’ve sewn these mittens!
I’ve checked out a lot of different patterns, blogs, YouTube videos and so forth on how to sew various items. I always find them very inspiring, but I also always find that the patterns (especially those you buy on paper or download) are often lacking in information. When a pattern says EASY on it, you expect to understand it even if you have rarely touched a sewing machine. I personally find that some key pieces of information (especially for beginners) is often missing. Information or tips such as what type of sewing machine needle or thread you should use. What settings are best on your sewing machine for certain types of fabric? Why does the under thread always get big loops in it?
I’m trying to get all this type of information into this post in a clear and concise way so that you find it fun and not frustrating!
This is my first time trying this, so please give me feedback or make comments on how difficult or easy it was to follow the pattern and understand what I did. Hashtag #upscalesandane on Instagram if you take a go at making these mittens! Since I will be explaining how to make these from scratch, I don’t actually have a pattern, so there is none to download. You will create your own pattern so that you can recreate them in the future for all sorts of sizes!
Materials:
- A used wool sweater preferably not felted too much otherwise the mittens become too stiff. In this example I use an Oleanna Sweater that had a lot of stains on the front of it. This will be the outer layer of your mittens.
- Wool long underwear. This can be from multiple pieces of clothing. In this example I used a wool baby onesie and a child’s long-sleeved shirt that had holes in them. I try to pick relatively thin wool fabric that is soft to the touch. This will make up the inner lining.
- A piece of woven cotton fabric (like standard quilting fabric) or tracing paper to make your pattern
- Size reference: The hand of the person you will make the mittens for (or another mitten)
- Fabric scissors
- Thread
- Hand needles
- Measuring tape
- Sewing machine
- Jersey stretch (ballpoint) sewing machine needle, or a standard needle size 80/12
Making your pattern


(Figures 1-2):
- Place your hand on the woven cotton fabric (or tracing paper) that you will make your pattern on (Figure 1). Draw around it using chalk. I tend to make a longer mitten so that it comes up higher on my arm. Keep in mind that you will need space for the seams, and for the fabric to go around your hand; so, your pattern should be at least 1.5 cm larger on all sides. This will be the top side of your mitten (Figure 2).
- Next, make the wrist end of the underside of your mitten. This will basically mimic your upper mitten but be cut in half just where your thumb attaches to your hand on the inside of your palm. You also need to add the thumb. Make the thumb relatively wide so that you have room to make adjustments later (Figure 2).
- Make a similar piece but for the fingertips and thumb again using the top side of the mitten as a pattern for the shape around the finger tips. Use the thumb drawn in step two to make the correct size of thumb (Figure 2).
- Cut out the pattern pieces (Figure 2).
Cutting your mitten fabric


(Figures 3-7)
- Place your pattern pieces on your wool fabric (Figure 3-7). Some things to keep in mind when placing your pattern pieces are:
- You will be cutting two of each pattern piece for both the outer mitten (thicker wool sweater) and inner mitten (thin wool underwear).
- You want the stretchiest direction of fabric to go across your hand so that it is easier to get your hand through the mitten opening. This way you don’t need to use any elastic later on and your mitten will fit snugly.
- If your sweater has a design on it (or is knit), keep in mind that you need to cut out mirror pieces of fabric (left and right hand!). You can do this by either folding the fabric in half before placing and cutting out your pattern, or by flipping the pattern over after cutting the first piece (Figure 3).
- It never hurts to add a little extra seam room to your pattern in the event that you need to make sewing adjustments later on.
- When you are done cutting out your fabric you will have 12 pieces that will turn into your mittens!
- To stay organized, place your mitten pieces together into piles so that you have a left and right hand for both the inner and outer mittens – four piles (not shown in photos.)
Setting up your sewing machine (and general tips)

(Figure 8):
- Get a piece of scrap material from the same fabric you are using for the mittens to test the sewing machine settings. Because the wool underwear is quite thin and stretchy the thread tension probably doesn’t need to be very high (lower number for thinner, more delicate fabric, higher number for thicker more durable fabric). I set mine to 2.5 for both fabric types.
- The stitch length is also important. If you are using a knit fabric that is not felted much you will want to use small stitch length to keep the yarn threads from unraveling. However, you don’t want the fabric to start curling and bending because the stitch length is too short. I used a stitch length of 2 for the most part.
- You will only need to use two types of stitches, straight and zig zag. The straight will be to sewn the mittens together, the zigzag is to bind the edges so that the fabric threads don’t start to unravel.
- “Right sides together” means lay the fabric pieces on top of each other so that when you turn the piece right side out after sewing you don’t see and seam edges.
- “Secure your seam” means go reverse and then forwards over the last 0.5 cm of your seam so that it doesn’t unravel. This locks the seam. Secure your seam at the start of and the end of every seam (even if not mentioned in every step).
Sewing
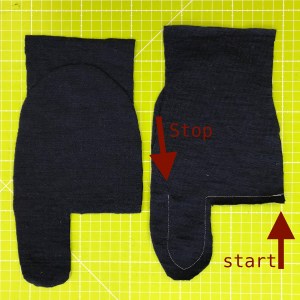


Figure 9 to 14
- Each of the four mitten piles will be sewn in exactly the same way.
- Place the underside (thumb pieces) right sides together so that your two pieces are giving you a thumbs up (Figure 9).
- Sew with straight stitch along the palm and thumb of the mitten until you come in line with the stitch along the palm (Figure 9).
- Try on the thumb and check how well it fits on your thumb and if it is too large sew smaller where needed.
- When the right size is obtained, trim the edges about 0.5 cm away from the seam to take away any excess fabric so that you don’t get fabric clumps (Figure 10).
- Sew zig zag along the edge of your fabric following the same straight seam sewn in point 3 (Figure 10).
- Open up the underside of the mitten you’ve sewn together and place it right sides together with your top piece.
- Place the thumb towards the wrist on the mitten and sew with a straight stitch around the mitten until you meet the stitch around the thumb. Secure the seam. Take the mitten out from under the presser foot, flip the thumb over and start again exactly where you finished the last seam and sew to the end of the mitten. This gives you a nice seam that doesn’t clump and won’t leave a hole (Figures 11 and 12).
- Try on the mitten to check for size. Sew smaller where/if needed.
- Use scissors to trim 0.5 cm from your seam to avoid clumping (Figure 13).
- Zig zag the edges of the mitten where you have already sewn to avoid unravel of threads (Figure 13).
- If you have had to cut along the wrist end of the mitten when you cut your pattern you will need to zigzag along the edges to avoid unravelling. In (Figure 14) you see that the light blue mitten pieces were cut along the edge of the sweater and didn’t need to be zigzagged, however the dark blue inner mitten does (I forgot to take a picture after zigzagging the edge).
- Repeat sewing steps 2-12 for all of the mittens.


Figure 15 to 18
- To help you sew the other mittens the same size as the first you can use a measuring tape to measure the length of the thumb, the seam across the palm and the distance from the palm seam to the finger tips (Figures 15-17).
- Place the four finished mittens on the table with wrong side outwards. Thumbs for each hand should be on the side and facing upwards (Figure 18).


Figure 19 – 22
- Roll up the wrist end of the inner mitten as shown in Figure 18.
- Place the inner mitten wrist into the outer mitten wrist so that right sides are together. Pin in place with 4 pins equally spaced (Figure 19).
- Sew the two mittens together with a straight seam following the edge of the mitten for three of the pins (3/4 of the way around the mitten, or at least 3 cm) (Figure 20). This will leave a hole big enough to turn the mittens right side out (Figure 21).
- Turn both the inner mitten and the outer mitten right side out, then fit the inner mitten into the outer one (Figure 22).
- Sew by hand a parallel seam (this makes the stitches invisible) to close up the hole (Figures 23-24).
- Repeat steps 1-5 for your remaining mitten.
- Congratulations! You are finished! (Figure 25).
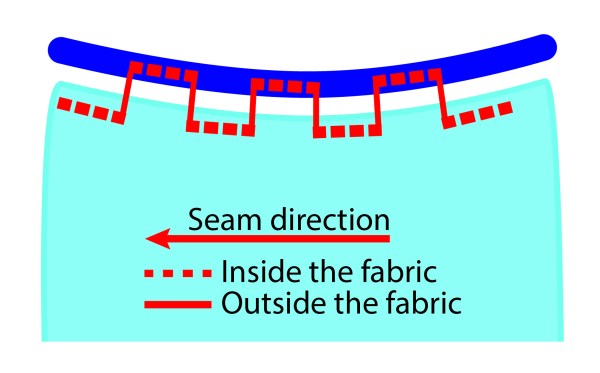


Figure 23 to 25